Add or Modify a Custom Wall Assembly
 |
 |
This dialog can be used to:
- Define and add a "custom wall" assembly to a project.
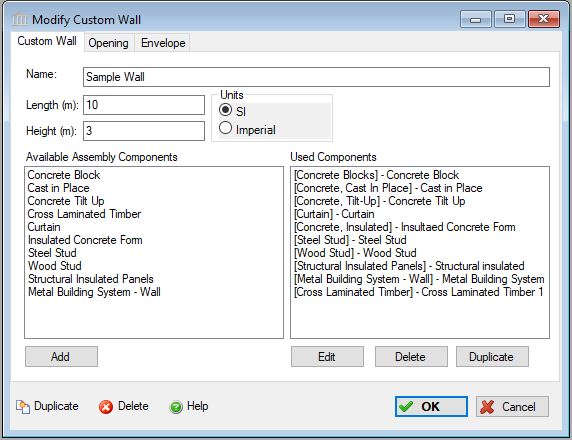
- Modify or view "custom wall" assembly that has been added to a project.
- Define openings for the "custom wall" assembly.
- Define an envelope for the "custom wall" assembly.
New to version 4 is the ability to combine multiple wall "component" sub-assemblies into a single "custom wall" assembly. You can think of a "custom wall" assembly as a container into which one or more similar or different types of wall "component" sub-assemblies are added.
When a new "custom wall" assembly is saved to the project, a new assembly node is added to the "Tree Control Window" under the Walls assembly group. Each of the "component" wall assemblies will be listed under the new "custom wall" assembly node but will not be accessible from within the tree control. To modify, view or delete a wall "component" sub-assembly, you will first need to open the "Modify Custom Wall" dialog to gain access to the wall "component" sub-assembly of interest.
A "custom wall" assembly can be comprised of one or more of each of the following "component" wall assemblies:
- Concrete Block Wall
- Concrete Cast-in-place Wall
- Concrete Tilt-up Wall
- Cross Laminated Timber Wall
- Curtain Wall
- Insulated Concrete Form Wall
- Steel Stud Wall
- Wood Stud Wall
- Structural Insulated Panels
- Metal Building System - Wall
| Description / Assumptions / Limits | Required inputs |
|---|---|
Custom Wall Assembly
|
|
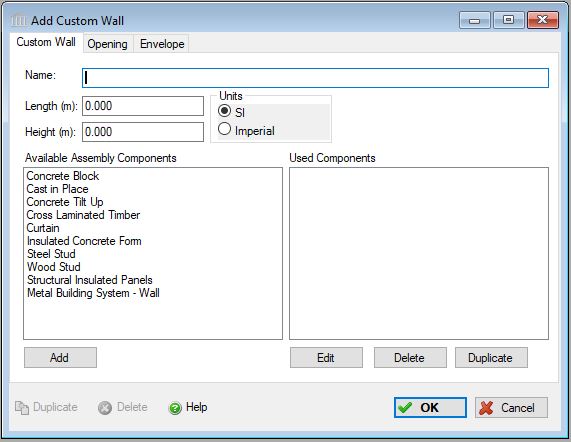
Field Descriptions:
- Name:
- Enter a name for this assembly. All assemblies within a project must be uniquely named within each assembly group. Names maybe alphanumeric (e.g., foundation 1).
Length:- Enter the over all length of the wall in either meters or feet.
Height:- Enter the over all height of the in either meters or feet.
- Available Component Buttons:
-
Add Button- Before you click this button, first select one of the "Available Assembly Components". Click this button to add a new component wall assembly of the selected component type to the custom wall assembly. When the new component assembly has been saved, it will appear in the "Used Components" list of the custom wall assembly. Double-clicking one of the "Available Assembly Components" will also add add a new component wall assembly of the selected component type to the custom wall assembly.
- Used Component Buttons:
-
Edit Button- Before you click this button, first select one of the "Used Components". Click this button to edit the selected "Used Component" wall assembly. This button is only enabled when one of the "Used Components" has been selected. Double-clicking one of the "Used Components" will also open the "modify assembly" form for the selected "Used Component" from which it can be edited.
Delete Button- Before you click this button, first select one of the "Used Components". Click this button to delete the selected "Used Component" wall assembly. This button is only enabled when one of the "Used Components" has been selected.
Duplicate Button- Before you click this button, first select one of the "Used Components". Click this button to duplicate the selected "Used Component" wall assembly. This button is only enabled when one of the "Used Components" has been selected.
Units:- Here you can set the units of measure as either "SI" or "Imperial". Changing the default units here affects only the current assembly but will not override the Default Units of Measure nor the Units of Measure settings for open projects or any other assemblies within open projects.
Duplicate Button- Click the "Duplicate" button to create an exact duplicate of the current custom wall assembly. The duplicate assembly will be added to the current project. This button is only available when editing or viewing an assembly that has already been saved in the current project.
Delete Button- Click the "Delete" button to delete the current custom wall assembly from the current project. This button is only available when editing or viewing an assembly that has already been saved in the current project.
Help Button:- Click the "Help" button to open the Help pop-up window.
OK Button- Click the "OK" button to accept and save the current custom wall assembly settings and close this dialog.
Cancel Button- Click the "Cancel" button to discard the current custom wall assembly settings and close this dialog.
Notes:-
- Length:
- The length for all "component" wall assemblies is inherited from the "Custom Wall".
Height:- The height for all "component" wall assemblies is inherited from the "Custom Wall".
Openings:- Openings are not captured for "component" wall assemblies. Rather, openings are defined for the "Custom Wall".
Envelope:- Envelope information is not captured for "component" wall assemblies. Rather, openings are defined for the "Custom Wall".