Composite Product Library Record
Note: There is a tutorial video that shows an example of defining your own custom product. It can be found in the Help menu, click Help Topics, and click Online Video Tutorials near the bottom of the left panel.
This dialog is launched when either the "Add" button or the "Edit" button is selected from the "Composite Product Library" dialog.
![]()
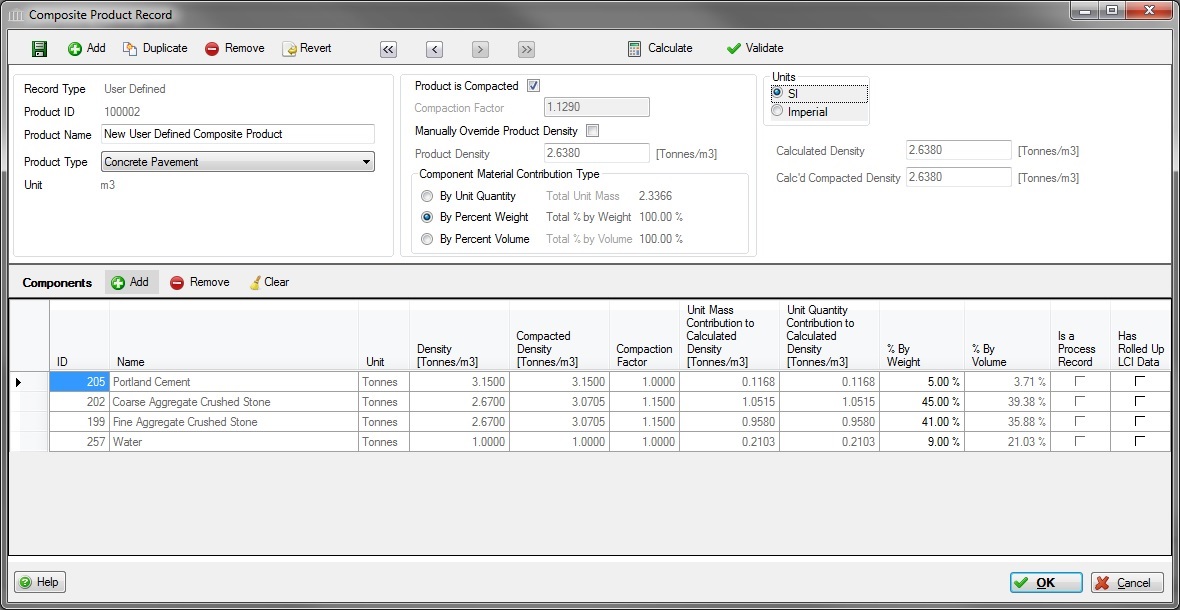
The "Composite Product Record" dialog provides the user with the opportunity to create, update and manage all of the details associated with a new or existing user defined concrete mix "recipes" that can be re-used in many assemblies across multiple projects.
A user defined concrete mix design is composed of a set of "raw" materials that have LCI data in the database and where "raw" material contributions to the user defined concrete mix design are specified in either the "% by Weight" field, the "% by Volume" field, or the "Unit Quanity" field.
Note:
Although all individual components' units of measure are expressed in Tonnes or Short Tons, the composite products are described here per m3 or yd3. It won't make a difference when you create a product based on "% by Weight" or "% by Volume", but it is crucial if you use "Unit Quantity". Be sure when using "Unit Quantity" that you input the quantities (masses) of each component that will be in a m3 or yd3 of the finished product (not the quantities that would be in a Tonne or Short Ton).
Instructions for Adding a new "Composite Product" record to the library:
- Enter a meaningful name in the "Product Name" field.
- Select the product type in the "Product Type" selection box.
- Some products may be compacted, like aggregates and asphalt pavements. Others, such as concrete pavements, will not be compacted. Check the "Product is Compacted" button and enter the compaction factor if applicable. The mass of products used in roadway elements will be calculated using their compacted densities and the volume of each element, while the equipment use may be calculated based on their uncompacted densities (e.g. aggregate is transported and moved uncompacted, but the final volume in a roadway is compacted).
- If you want to manually set the final mix density, check the "Manually Override Calculated Density" checkbox and enter the product density in the box. To have the density automatically calculated according to your added components, uncheck the override box.
- Select the "Component Material Contribution Type" from the following list:
- By Percent Weight
- By Unit Quantity
- By Percent Volume
- Add the" Components" that compose the "Composite Product" record.
Instructions for Adding "Components" to the "Composite Product" record:
- Click the "Add" button
 to launch the "Select a Material from the Database" dialog. As you choose component materials, they will be added to the product record.
 - For each component, enter the contributiion in the appropriate column, either by Unit, % Weight or % Volume (according to what choice you made in the Contribution Type above).
- Repeat if necessary to add new components.
Constraints:
- If the "Component Material Contribution Type" is "By Percent Weight", then the Component Material "% By Weight" values must sum to 100%.
- If the "Component Material Contribution Type" is "By Percent Volume", then the Component Material "% By Volume" values must sum to 100%.
- For all Component Material "Process" records, e.g., "Ready Mix Concrete Plant Process", the Contributon Type can only by "By Unit Quantity". For instance, 1 unit of "Ready Mix Concrete Plant Process" is used to manufacture 1 unit of a Ready Mix Concrete Mix Design.
Library Record Navigation & Management Save
Save- Click this button to save the "Composite Product" library.
- Add
- Click this button to add a new "Composite Product" record to your library.
 Duplicate
- Click this button to create an exact duplicate of the selected "Composite Product" record.
 Remove:
- Click this button to remove the selected "Composite Product" record from the library.
 Revert:
- Click this button to Undo any changes and revert the "Composite Product" library data to its last saved state. Any changes made to the library since the last time it was saved can be effectively undone by clicking this button.
 First Record:
- Click this button to load and edit the first record in the parent data table. Clicking this button will cause any changes to the current record to be saved.
 Previous Record:
- Click this button to load and edit the previous record in the parent data table. Clicking this button will cause any changes to the current record to be saved.
 Next Record:
- Click this button to load and edit the next record in the parent data table. Clicking this button will cause any changes to the current record to be saved.
 Last Record:
- Click this button to load and edit the last record in the parent data table. Clicking this button will cause any changes to the current record to be saved.
 Calculate:
- Click this button to forcibly (re)calculate the Component "Density Contribution" and the "Calculated Density" values.
 Validate:
- Click this button to (re)validate the editable field values in this dialog and display any error messages. Validation automatically happens when a "Save" event occurs (e.g., when any of the "Save", "OK", or "Navigation" buttons are clicked).
Component Materials- Add
- Click this button to launch to launch the "Select a Material from the Database" dialog.
- Remove:
- Click this button to remove the selected "Component Material" from the current library record.
 Clear:
- Click this button to Clear all "Component Materials" from the current library record.
Other Buttons Help Button
- Click this button to open the Help pop-up window.
- OK Button
- Click this button to save the "Composite Product" library, then close this dialog.
 Cancel Button
- Click this button to discard all changes to the "Composite Product" library since the last save, then close this dialog.